|
THIRDGEN REAR SUSPENSION REBUILD |
|
Overview |
If you plan on doing much work on the suspension of your Thirdgen, then you better get ready for a lot of bloody knuckles and a lot of swearing. Those bolts and suspension pieces have been on the car for anywhere from 11-21 years, and they don't want to budge. Here are some tools that you will want to make sure that you have handy:
Sockets - Make sure that you have a lot of relatively large sockets on hand. Mine were all metric, so I bet that yours will be too. I think that the largest that I needed was 21mm if I remember right.
Drive Tools - Ratchets, Breaker Bars, etc. The bigger the better.
Pipes - You will need some pipes to fit over your ratchets and breaker bars so that you can get some leverage. I used one of the pipes that actually is part of the handle of my jack. It worked great. You will definitely want to have them though so you can get as much leverage as possible.
Penetrating Oil - To try to loosen the bolts, spray the hell out of them with liquid wrench or something like it. Let it sit, and go for it.
Impact Tool - The thing that you put a socket on and hit with a hammer. It may help in a couple spots, but most of them you can't get a hammer in the correct spot to hit it with.
Air-Powered Impact Tools - I have an impact wrench that I used, but honestly, it didn't help much. I did use it to save some time, but for the bolts that are REALLY stuck, it didn't do a damn thing. But still, it is nice to have.
|
Torque Arm |
| Installation Notes |
I have to admit that getting the Torque Arm on was probably the WORST time I have had in a loooong time. Some of my problems came from the TA itself, others came from my car.
The problems that really didn't have anything to do with the TA came from the mounting locations for the cross member of the TA. On Thirdgens with an automatic (or at least '91s) the tranny cross member uses four bolts...two on each side. On the "frame rails" of the car, there are six holes...three on each side. Since the original cross member only uses two of the three holes on each side, there is an extra that has nothing in it. This extra hole in my case (which is threaded for a bolt) was rusted pretty badly. So, that had to get drilled out. Nothing too bad here, except for the fact that as I was drilling it, there were hundreds of little pieces of hot steel flying off the drill bit and onto my bare arm. That hurt a little, but I was too stubborn to cover my arm with anything.
Then, three out of the other four bolts were at one time replaced with bolts that came from the top, and went down through the frame rail, so that there was a "stud" to mount a nut on to hold the cross member on. There wasn't anywhere to thread a bolt into from underneath.
So, out of the six possible bolt locations, two were never used and rusted to the point of no return, three were not even there and were replaced with bolts from "inside" the frame rail, and one was still good. There was no point having one original threaded one and five that were no longer there, so I just drilled out the last one.
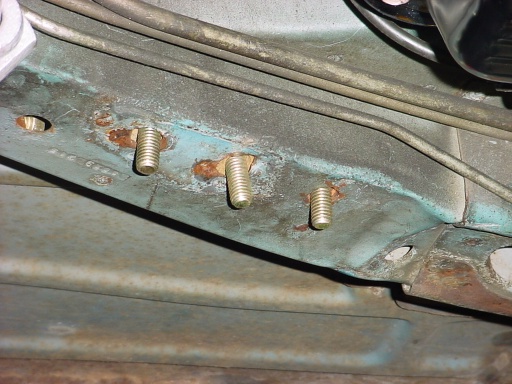
That left basically 6 holes in the bottom of the frame rail to which I was supposed to attach the cross member of the TA. Since this was part of the frame rail, and the only thing above it was the floor boards, there was no way to just drop in a bolt from above. There was a small hole about 1-1/2" x 2" on the rail that was a few inches in front of the first mounting hole. So, I had to come up with a plan to get the bolts through the hole, and to drop them down through the mounting holes.
To do this, I took a 12" piece of threaded rod I had laying around, and a rubber band. I took the bolt that I wanted to use and used the rubber band to stick it to the end of the threaded rod. Then, I bent the threaded rod to the best shape to allow me to navigate it through the frame rail. I took the rod, and carefully inserted it into the frame rail, dropped the bolt through the hole, and just yanked the rod, which pulled the rod off the bolt. It was a pain, but it worked.
Here is a picture of the mounting bolts that I used...
You can see the "access hole" that I put the threaded rod though at the right side of the picture.
| Hardware Required |
The original bolts that hold the torque arm onto the rear end were a little too short. This is because the stock torque arm is a lot thinner than the Spohn TA at that location. So, I decided to get longer bolts just to be sure that it held as best as possible.
The bolts are Grade-8, and the size is 9/16 x 8", and they are coarse thread.
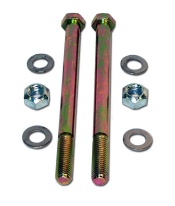
I could not find a bolt like this locally. For some reason, I could only find these bolts in a 7" length, which is too small. So, I ended up getting them directly from Spohn for $15. They are Spohn part # 982.
|
Lower Control Arms |
| Installation Notes |
Removing the LCAs was a real pain in the ass...I'm not going to lie. But, the reason that I had the trouble that I did is not necessarily going to happen to all cars. On both LCAs, the bolts that were at the body (not the axle) gave me problems. The metal part of the rubber bushing on the stock LCA got rusted stuck to the LCA mounting bolt, and would NOT come off. No matter what. I tried everything that I possibly could, with NO success whatsoever. What it came down to was taking a sawzall and cutting the bolts off at each end of the metal sleeve within the rubber bushing.
| Hardware Required |
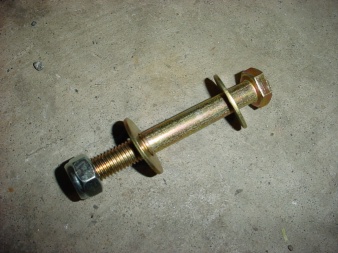
I did not reuse the bolts that I removed when taking out the LCAs. I think it is a waste to reuse bolts on just about anything, especially when they were as old and rusted as they were. I replaced them with a larger bolt, just because I wanted to get a tighter fit between the bolt and the inner metal sleeve on the bushing of the LCA.
The bolts that I used are a metric thread. They are "M12x1.75x100". They were graded bolts, graded at "10.9". I used regular old standard grade 8 7/16" washers on each end, and a corresponding metric nylon locknut. I'm not sure if the nylon locknut was the best way to go, but it made sense to me.
Here is a pic of the bolt...
|
Lower Control Arms |
| Installation Notes |
The removal of the panhard rod was a little bit of a pain too. The bolt at the body once again gave me problems. The one at the axle came with a lot of problems, but nothing huge. It just took a LOT of elbow grease, but at least I didn't have to cut anything. I used the penetrating grease, and a breaker bar with the pipe on the end.
I again replaced the hardware. I used M14x2.0x70 I think. The length may be 80...I don't remember. These are graded bolts too, graded at 10.9
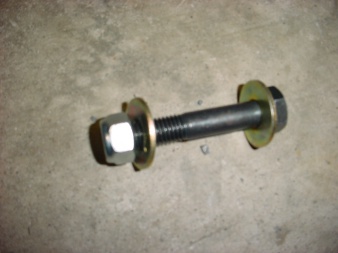
This is a crappy picture, but you can get the idea. This bolt has a black coating on it, but it is still the same type bolt as the LCA bolt above.